#!/bin/bash

# 定义镜像列表
IMAGES=(
    "nginx:latest"
)

# 定义目标目录
TARGET_DIR="download-images"

# 创建目标目录
mkdir -p "${TARGET_DIR}"
echo "创建目录: ${TARGET_DIR}"

# 遍历镜像列表,拉取并导出
for image in "${IMAGES[@]}"; do
    # 拉取镜像
    echo "开始拉取镜像: ${image}"
    docker pull "${image}"

    # 提取镜像名称作为文件名(替换特殊字符)
    filename=$(echo "${image}" | sed 's/[:\/]/_/g').tar
    filepath="${TARGET_DIR}/${filename}"

    # 导出镜像
    echo "开始导出镜像到: ${filepath}"
    docker save "${image}" -o "${filepath}"

    if [ $? -eq 0 ]; then
        echo "成功导出: ${image}"
    else
        echo "导出失败: ${image}" >&2
    fi

    echo "-------------------------"
done

echo "所有镜像处理完成!导出文件保存在: $(pwd)/${TARGET_DIR}"一个简单的Vue3 轮播图组件
<script setup>
import { onMounted, onUnmounted, ref, useSlots } from 'vue'

const slots = useSlots()
const slides = ref([])
const originalSlidesLength = ref(0)
const currentIndex = ref(0)
const isDragging = ref(false)
const startX = ref(0)
const currentTranslate = ref(0)
const prevTranslate = ref(0)
const props = defineProps({
  autoPlay: {
    type: Boolean,
    default: false
  }
})

onMounted(() => {
  const originalSlides = slots.default()[0].children.map((slide, index) => ({ content: slide, key: index }))
  originalSlidesLength.value = originalSlides.length
  slides.value = [...originalSlides, originalSlides[0]]
  startAutoPlay()
})

let autoPlayInterval
const startAutoPlay = () => {
  if (!props.autoPlay) return
  autoPlayInterval = setInterval(() => {
    goToNextSlide()
  }, 3000)
}

const goToNextSlide = () => {
  if (currentIndex.value < slides.value.length - 2) {
    currentIndex.value += 1
  } else {
    currentIndex.value = 0
    updateTranslate(true)
    return
  }
  updateTranslate()
}

const startDrag = (event) => {
  isDragging.value = true
  startX.value = event.clientX
  prevTranslate.value = currentTranslate.value
  clearInterval(autoPlayInterval)
}

const onDrag = (event) => {
  if (isDragging.value) {
    const currentX = event.clientX
    const diff = currentX - startX.value
    currentTranslate.value = prevTranslate.value + (diff / window.innerWidth) * 100
  }
}

const endDrag = () => {
  if (isDragging.value) {
    isDragging.value = false
    const movedBy = currentTranslate.value - prevTranslate.value

    if (movedBy < -10 && currentIndex.value < slides.value.length - 2) {
      currentIndex.value += 1
    } else if (movedBy > 10 && currentIndex.value > 0) {
      currentIndex.value -= 1
    } else if (movedBy > 10 && currentIndex.value === 0) {
      currentIndex.value = slides.value.length - 2
    } else if (movedBy < -10 && currentIndex.value === slides.value.length - 2) {
      currentIndex.value = 0
    }

    updateTranslate()
    startAutoPlay()
  }
}

const updateTranslate = (instant = false) => {
  prevTranslate.value = -currentIndex.value * 100
  currentTranslate.value = prevTranslate.value
  if (instant) {
    requestAnimationFrame(() => {
      currentTranslate.value = prevTranslate.value
    })
  }
}

const goToSlide = (index) => {
  currentIndex.value = index
  updateTranslate()
}

onUnmounted(() => {
  clearInterval(autoPlayInterval)
})
</script>

<template>
  <div class="carousel-container">
    <div
      class="carousel"
      @mousedown="startDrag"
      @mousemove="onDrag"
      @mouseup="endDrag"
      @mouseleave="endDrag"
      :style="{ transform: `translateX(${currentTranslate}%)`, transition: isDragging ? 'none' : 'transform 0.3s ease' }"
    >
      <div v-for="(slide, index) in slides" :key="slide.key" class="slide">
        <component :is="slide.content"></component>
      </div>
    </div>

    <div class="indicators">
      <span
        v-for="(indicator, index) in slides.slice(0, originalSlidesLength)"
        :key="index"
        class="indicator"
        :class="{ active: currentIndex === index || (currentIndex === slides.length - 1 && index === 0) }"
        @click="goToSlide(index)"
      ></span>
    </div>
  </div>
</template>

<style scoped>
.carousel-container {
  position: relative;
  width: 100%;
  height: 100%;
  margin: 0 auto;
  overflow: hidden;
  padding-bottom: 30px;
}

.carousel {
  height: 100%;
  display: flex;
}

.slide {
  min-width: 100%;
  height: 100%;
  display: flex;
  align-items: center;
  justify-content: center;
  font-size: 2em;
  color: white;
  user-select: none;
}

.indicators {
  position: absolute;
  bottom: 10px;
  left: 50%;
  transform: translateX(-50%);
  display: flex;
  gap: 10px;
}

.indicator {
  width: 10px;
  height: 6px;
  background-color: rgba(255, 255, 255, 0.5);
  cursor: pointer;
  transition: background-color 0.3s ease;
}

.indicator.active {
  background-color: rgba(255, 255, 255, 1);
}
</style>
如何使用 unplugin-auto-import 和 unplugin-vue-components 自动导入组件、ui库、单文件组件
自动导入Vue 、Vue-route、pinia、AntdV、Vant
import { defineConfig } from 'vite'
import vue from '@vitejs/plugin-vue'
import vueJsx from '@vitejs/plugin-vue-jsx'
import vueDevTools from 'vite-plugin-vue-devtools'
import AutoImport from 'unplugin-auto-import/vite'
import Components from 'unplugin-vue-components/vite'
import { VantResolver } from '@vant/auto-import-resolver'
import { AntDesignVueResolver } from 'unplugin-vue-components/resolvers'
import GetLoginTemplate from './src/utils/GetLoginTemplate'
import { AntDesignIconResolver,AntDesignApiResolver } from './src/utils/AntDesignResolver'

export default defineConfig({
  server: {
    host: '',
    proxy: {
      '/api': 'http://localhost:4000'
    }
  },
  plugins: [
    vue(),
    vueJsx(),
    vueDevTools(),
    AutoImport({
      dirs: ['@/utils/Composable/**'],
      eslintrc: {
        enabled: true,
        filepath: '.eslintrc-auto-import.json',
        globalsPropValue: true
      },
      imports: ['vue', 'vue-router', 'pinia'],
      include: [/\.[tj]sx?$/, /\.vue$/, /\.vue\?vue/, /\.md$/],
      dts: 'auto-imports.d.ts',
      resolvers: [
        VantResolver(),
        AntDesignVueResolver({ importStyle: 'less' }),
        AntDesignApiResolver()
      ]
    }),
    Components({
      dirs: ['./src/components/**', './src/utils/Composable/**', './src/Layout/**'],
      extensions: ['vue'],
      exclude: [/node_modules/, /\.git/, /\.nuxt/, /dist/, /public/, /test/, /mocks/],
      include: [/\.vue$/, /\.vue\?vue/, /\.md$/, /\.ts$/, /\.js$/, /\.jsx$/, /\.tsx$/],
      deep: true,
      dts: 'components.d.ts',
      resolvers: [
        VantResolver(),
        AntDesignVueResolver({ importStyle: 'less' }),
        AntDesignIconResolver()
      ]
    })
  ],
  resolve: {
    alias: {
      '@': fileURLToPath(new URL('./src', import.meta.url))
    }
  },
  css: {
    preprocessorOptions: {
      scss: {
        additionalData: '@import "@/assets/variables.scss";'
      }
    }
  }
})
继续阅读“如何使用 unplugin-auto-import 和 unplugin-vue-components 自动导入组件、ui库、单文件组件” Macos安装conda 切换源
下载安装
https://docs.anaconda.com/miniconda/
切换源
pip config set global.index-url https://pypi.tuna.tsinghua.edu.cn/simple
初始化虚拟环境
cd work_dir
conda create -n space_name python=3.8
conda activate space_name如何通过 openvpn 连接服务器
sudo curl -O https://raw.githubusercontent.com/angristan/openvpn-install/master/openvpn-install.sh
sudo chmod +x openvpn-install.sh

sudo ./openvpn-install.sh

根据提示选择
下载配置文件
导入客户端即可连接


注意:如果是云服务器需要开放对应的tcp/udp端口
TS实现一个简单的 pick 方法

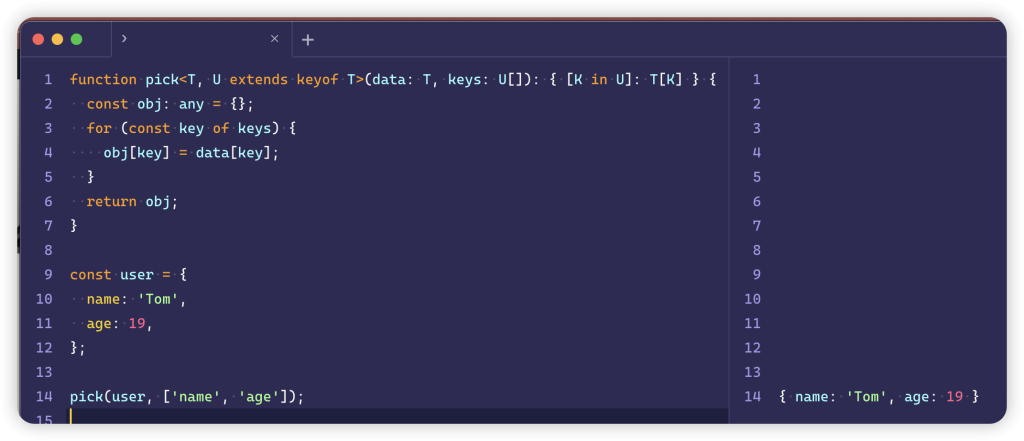
function pick<T, U extends keyof T>(data: T, keys: U[]): { [K in U]: T[K] } {
  const obj: any = {};
  for (const key of keys) {
    obj[key] = data[key];
  }
  return obj;
}

const user = {
  name: 'Tom',
  age: 19,
};

pick(user, ['name', 'age']);
scp远程复制
注:如果使用 root 用户,需要配置sshd_config文件 打开root远程登录
ListenAddress 改为 0.0.0.0 或 ip地址
PermitRootLogin 改为 yes
使用 systemctl restart sshd 重启
一、 从 本地 复制到 远程
1. 复制文件
(1.)不修改文件名
scp local_file remote_username@remote_ip:remote_folder
(2.)修改文件名
scp local_file remote_username@remote_ip:remote_file
2. 复制目录
scp -r local_folder remote_username@remote_ip:remote_folder
二、从 远程 复制到 本地
1. 从 复制文件
(1.)不修改文件名
scp remote_username@remote_ip:remote_folder local_file
(2.)修改文件名
scp remote_username@remote_ip:remote_file local_file
2. 复制目录
scp -r remote_username@remote_ip:remote_folder local_folder
Docker 网络代理配置
[Service]
Environment=”HTTP_PROXY=http://192.168.0.49:3128″
Environment=”HTTPS_PROXY=http://192.168.0.49:3128″
mkdir /etc/systemd/system/docker.service.d && vim /etc/systemd/system/docker.service.d/http-proxy.conf
brew update 更新失败
cd "$(brew --repo)"
git remote set-url origin https://mirrors.ustc.edu.cn/brew.git
cd "$(brew --repo)/Library/Taps/homebrew/homebrew-core"
git remote set-url origin https://mirrors.ustc.edu.cn/homebrew-core.git重新执行 brew update
Spring Boot 中使用 SseEmitter 实现服务器推送消息
Spring Boot 中使用 SseEmitter 实现服务器推送消息的功能,可以通过维护一个连接池来记录当前连接数。具体步骤如下:
- 定义一个 ConcurrentHashMap 用于保存连接池,key 为用户 id 或其它唯一标识符,value 为 SseEmitter 对象。
swiftCopy codeprivate final ConcurrentHashMap<String, SseEmitter> sseEmitterMap = new ConcurrentHashMap<>();
继续阅读“Spring Boot 中使用 SseEmitter 实现服务器推送消息” 
